装了一个centos6.4 64位双系统,本想用最新的fcitx,可是装的时候,一堆问题,package 'gio-2.0>=2.26' not found,这个问题就是解决不了,提示的包找不到,包装了,还是找不到。还是老实一点装3系列的。
一,安装fcitx依赖包
[root@localhost download]$ yum install gettext gettext-devel libXft libXft-devel libXpm libXpm-devel\
 automake autoconf libXtst-devel gtk+-devel gcc zlib-devel libpng-devel gtk2-devel glib-devel
这一步不做的话,也行,只不过编译安装的时候,会提示这个包找不到,哪个包找不到,到时你在装也行。不过会比较郁闷。哈哈。
二,下载并安装fcitx
[root@localhost download]$ wget http://fcitx.googlecode.com/files/fcitx-3.6.4.tar.gz

[root@localhost download]$ tar zxvf fcitx-3.6.4.tar.gz
[root@localhost download]$ cd fcitx-3.6.4
[root@localhost fcitx-3.6.4]$ ./autogen.sh
[root@localhost fcitx-3.6.4]$ mkdir /usr/local/fcitx
[root@localhost fcitx-3.6.4]$ ./configure --prefix=/usr/local/fcitx
[root@localhost fcitx-3.6.4]$ make && make install
不提示报错就装成功了,也可以这样看
[zhangy@localhost ~]$ /usr/local/fcitx/bin/fcitx -h   //出现这样的东西,就说明装成功了。
Usage: fcitx [OPTION]
 -d        run as daemon(default)
 -D        don't run as daemon
 -c        (re)create config file in home directory and then exit
 -n[im name]    run as specified name
 -v        display the version information and exit
 -h        display this help and exit
三,配置fcitx输入法
1,创建fcitx输入法文件
[root@localhost fcitx-3.6.4]# vim /etc/X11/xinit/xinput.d/fcitx.conf
XIM=fcitx
XIM_PROGRAM=/usr/local/fcitx/bin/fcitx
XIM_ARGS=”-d”
GTK_IM_MODULE=xim
QT_IM_MODULE =fcitx
2,设置fcitx输入法文件为默认
[root@localhost ~]$ mv /etc/alternatives/xinputrc /etc/alternatives/xinputrc.bak         //原来备份一下
[root@localhost ~]$ ln -s /etc/X11/xinit/xinput.d/fcitx.conf /etc/alternatives/xinputrc  //设置fcitx为默认输入法
3,设置个人环境变量
[zhangy@localhost ~]$ vim ~/.bashrc       //注意用户,最好是常用登录用户。修改一下内容
# User specific aliases and functions
# export GTK_IM_MODULE=ibus               //这是以前的
#  export XMODIFIERS=@im=ibus
#  export QT_IM_MODULE=ibus
#export LANG="zh_CN.UTF-8"                 //如果系统字符不是中文的话,这个要加,不然乱码
export XIM=fcitx                          //这是新的
export GTK_IM_MODULE=xim
export XMODIFIERS=@im=fcitx
export QT_IM_MODULE=fcitx
4,去掉多余输入法,这一步可做,可不做。
fcitx里面有五笔,五笔拼音,拼音,双拼,二笔等。其实有很多我们是用不到的,所以不需要的就可以拿掉,我只需要五笔拼音
[root@localhost zhangy]# gedit /usr/local/fcitx/share/fcitx/data/config    //修改以下内容

[输入法]
使用拼音=0                //把 使用拼音=1 改成 使用拼音=0
拼音名称=智能拼音
使用双拼=0                //把 使用双拼=1 改成 使用双拼=0
双拼名称=智能双拼
默认双拼方案=自然码
使用区位=0                //把 使用区位=1 改成 使用区位=0
区位名称=区位
使用码表=1
提示词库中的词组=1
其他输入法=

[root@localhost zhangy]# gedit /usr/local/fcitx/share/fcitx/data/tables.conf  //用gedit不乱码

#以#打头的为注释
[码表]
名称=五笔拼音
码表=wbpy.mb
调频=2
拼音=0
拼音键=z
自动上屏=-1
空码自动上屏=-1
自动词组=1
保存自动词组=3
#最长词组字数=2
精确匹配=0
提示编码=0
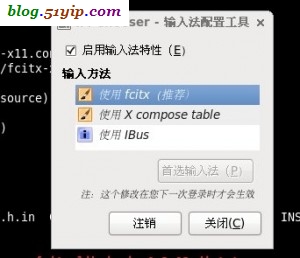
5,在菜单 系统=》首选项=》输入法,进行下面的操作
然后点注销重新登录就OK了。
转载请注明
作者:海底苍鹰
地址:http://blog.51yip.com/linux/1529.html
